WordPress on Netlify - Step by Step Complete Guide (2022)
Hint
This is an old tutorial which uses wp2static wordpress plugin. We have recently launched a more robust tutorial using simply-static wordpress plugin. You can check it on WordPress on Netlify using Simply Static WordPress Plugin.
Deploying a WordPress website on Netlify is a very straightforward process. One needs to have a working installation of WordPress (either on a local machine or on a remote host/service provider), a Netlify account, and a WordPress to Static website converter plugin.
WordPress on Netlify
Although deploying WordPress on Netlify is simple, but it can still be cumbersome as you need to fix several pieces of a big puzzle. This post is an attempt to document that information which is not readily available at a single place on internet.
This step-by-step guide tries to connect all the dots and solve this problem. In this guide, we will also explain the complete workflow on hosting your WordPress website as a Static website on Netlify.
Why WordPress?
WordPress is one of the most popular and widely used content management systems (CMS) for the worldwide web. The following characteristics make it unique. You can get more insights about these advantages by looking on a dedicated post on advantages of installing WordPress on localhost.
- Free as Freedom
- Easy to customize with Themes and Plugins
- Popular and most widely used Content Management System
- WordPress is SEO Friendly with additional customization using Plugins like Yoast or Rank Math.
- Several One-Click Installation methods exits (local and cloud installations)
This guide recommends using Bitnami Installer for a local installation on Virtual Machine. Alternatively, you can also use your hosting service provider.
Why Netlify?
Netlify is a famous static hosting service provider with a lucrative free tier program. There are several other static hosting services, but this guide recommends Netlify because
- Netlify is experts of Static Hosting, they provide complete stack for static hosting
- Scalability – You can choose a plan as per your need and scale as the time comes.
- Netlify Forms offer data handling from user without implementing any dynamic component into your website.
- Netlify offers Split (A/B) Testing out of the box
WordPress to Static Site Plugins
WordPress’ websites are dynamic and one needs to convert that website into static. There are several WordPress plugins and stand-alone software that can be used to generate static content. This guide recommends the use of the WP2STATIC plugin. This plugin consists of several sub plugins and supports Netlify out of the box. One should download them from our download page. Following plugins (and add-ons) are very helpful.
- Core Plugin – WP2Static Add-on: Netlify Deployment
- WP2Static Add-on: Zip Deployment
- WP2static Add-on Advanced Crawling
Install WP2STATIC plugins on your website. You should at least install the zip file plugin. For easy synchronization of your website with Netlify, you can install the Netlify plugin as well.
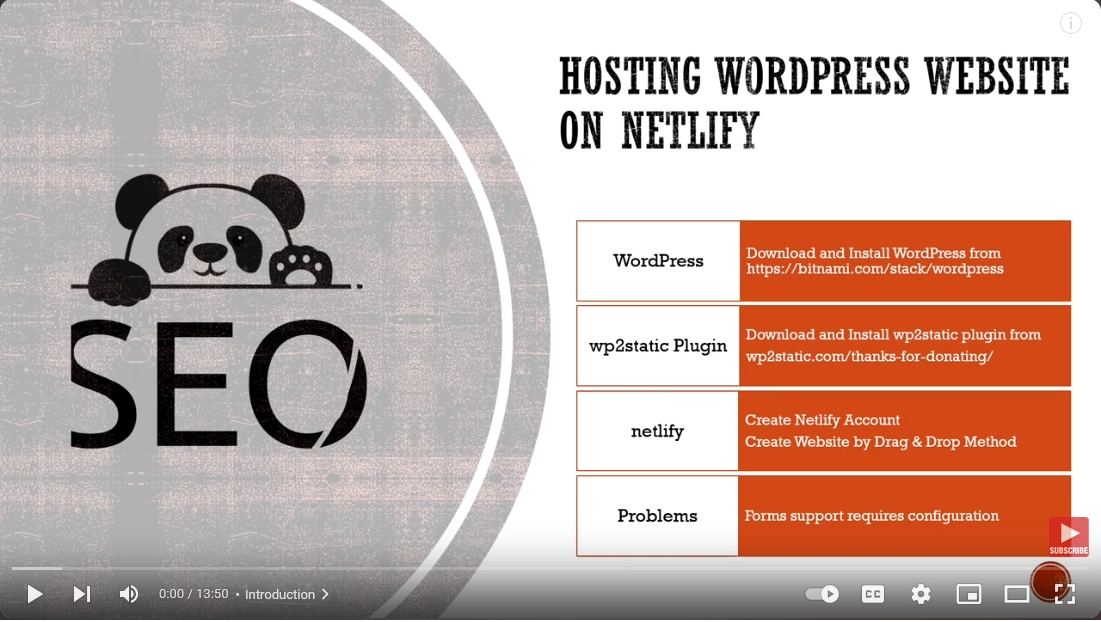
How to Convert WordPress Site to a Static Website?
The static website is first downloaded as a zip file and uploaded to Netlify. This process creates a new site on Netlify and is hence useful to create a Site ID automated deployment of the static website generated using the following steps. WP2Static add-ons for Netlify are configured to automatically sync the static website with Netlify using Site ID and Netlify Application Token.
This procedure is explained in the following video.
WordPress on Netlify: How to Deploy WordPress on Netlify - YouTube Video Opens in New Tab [See Terms and Conditions for 3rd party links.]
Tweaking & Configurations
Netlify 404 Error Page for WordPress Website
Static websites require extra configuration to fix 404 errors. This is also true for WordPress based websites generated using WP2Static plugins. Adding a 404.html page to a static website is enough for handling 404 errors. This should be automatically done by static site generation plugins e.g. WP2Static but unfortunately, this is not the case and one needs to take care of this manually.
One can also include netlify.toml file or 404.html file if you are planning to host your website on Netlify. The following error will show up if 404-page handing is not properly done on Netlify.
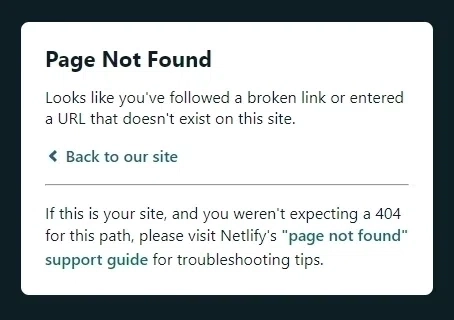
netlify 404 error [Image Credits: Faisal Shahzad (SEO Wings)]
You can use the following procedure to fix 404 errors on your WordPress Static Website (generated using WP2Static plugin) which is hosted on Netlify.
- You need to create a new page with a meaningful name which represents the error. A good starting point is 404-error page. This page should be published and live.
- Create a Cache of your static website by clicking on Generate static site as shown below.
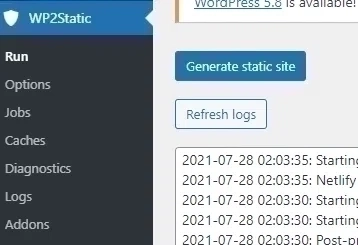
wp2static generate static site cache [Image Credits: Faisal Shahzad (SEO Wings)]
- Now go to your wp-content/uploads/wp2static-crawled-site folder by using any file management plugin e.g. WP File Manager. Here, you can open the folder 404-error and rename index.html to 404.html.
- Now copy this 404.html to your root folder, which is wp-content/uploads/wp2static-craw. This should fix your problem of 404 handling and all routes should be working/handling fine as expected.
- If you are interested in a video demonstration, then I have created a YouTube video which shows the procedure step by step.
WordPress on Netlify: How to Configure 404 Page - YouTube Video Opens in New Tab [See Terms and Conditions for 3rd party links.]
DNS and SSL Certificate
Once you are done with hosting on Neltify, you can configure Netlify DNS for custom domain names and SSL Certificates, as shown in the following videos.
WordPress on Netlify: How to Configure Netlify DNS with Namecheap - YouTube Video Opens in New Tab [See Terms and Conditions for 3rd party links.]
Netlify Forms for WordPress Website
WordPress forms will not work with Netlify as they have different submit tags. To achieve this, you need to create two pages on WordPress.
- Create Thank You, Page which you want to show to the user after form submission.
- Create Contact Us Page which contains the form. In Gutenberg editor, insert custom HTML block and add the following code.
<form name="contact" method="POST" data-netlify="true" action="/thank-you/">
  <p>
    <label>Your Name: <input type="text" name="name"></label>
  </p>
  <p>
    <label>Your Email: <input type="email" name="email"></label>
  </p>
  <p>
    <label>Message: <textarea name="message"></textarea></label>
  </p>
  <p>
    <button type="submit">Send</button>
  </p>
</form>
Now publish both pages and sync your files with Netlify by clicking on Run button. Your Netlify forms should work now.
<p>
  <input type="file" id="myFile" name="filename">
</p>
Troubleshooting
How to manage Mixed Content Issues?
After updating/publishing your website on Netlify, you might get a Mixed Content error. This might create vulnerabilities for your website as your website is hosting both HTTP/HTTPS content. To resolve this, you need to dig into the email or look. Open your email and look into the deployment logs. In the logs, you will see the source of the issue as shown in the following image.
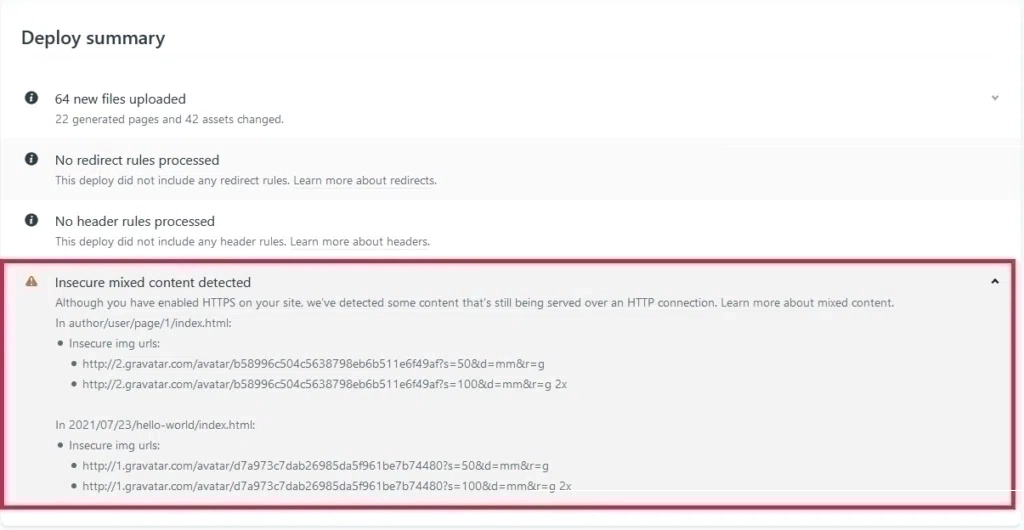
Netlify Mixed Content Error on Deploy Summary [Image Credits: Faisal Shahzad (SEO Wings)]
In the image, you will see the source of the error. The following example shows the mixed content error is due to the profile image or Avatar. To solve this, you can simply install the WP User Profile Avatar plugin and then upload your profile image.
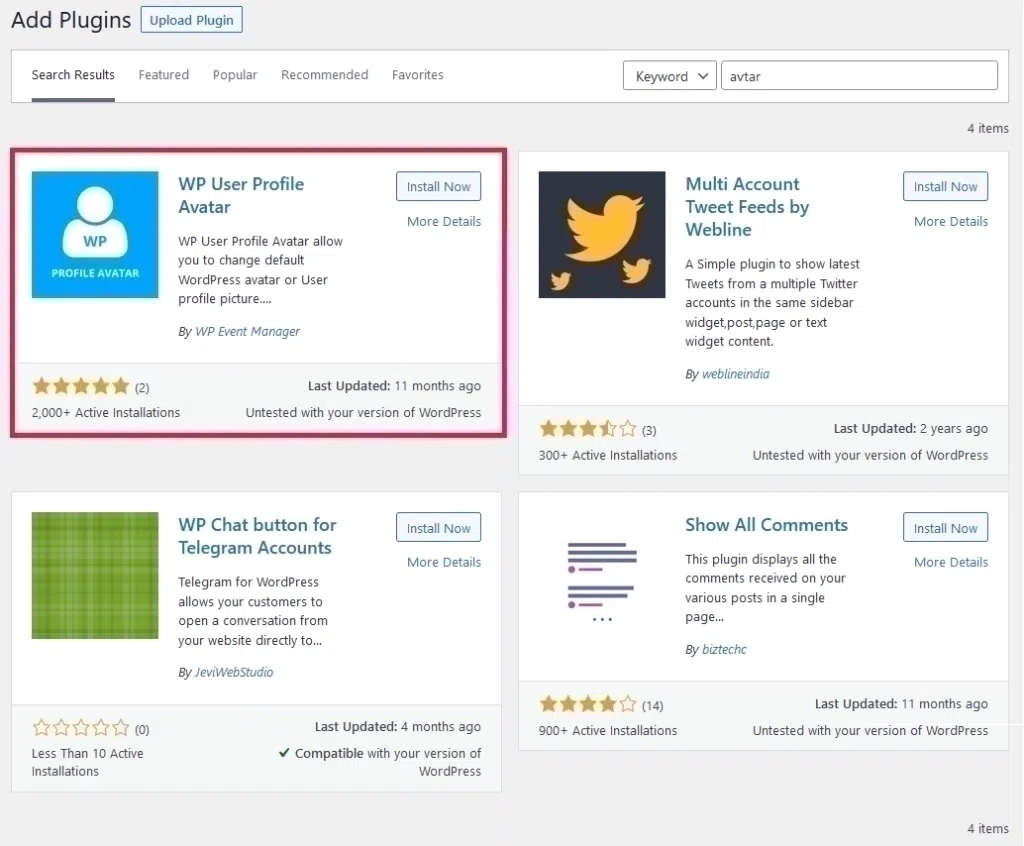
WordPress add WP User Profile Avtar [Image Credits: Faisal Shahzad (SEO Wings)]
Now update your avatar and submit your website again to Netlify by clicking on run -> Generate static site.
wp2static generate a static site [Image Credits: Faisal Shahzad (SEO Wings)]
This will regenerate your website and your mixed content error will not appear again. You can follow the same procedure to other content which is generating mixed content errors. You will get these mixed content errors from 3rd Party plugins. So make sure to debug your deployment summary to find the source of the error.
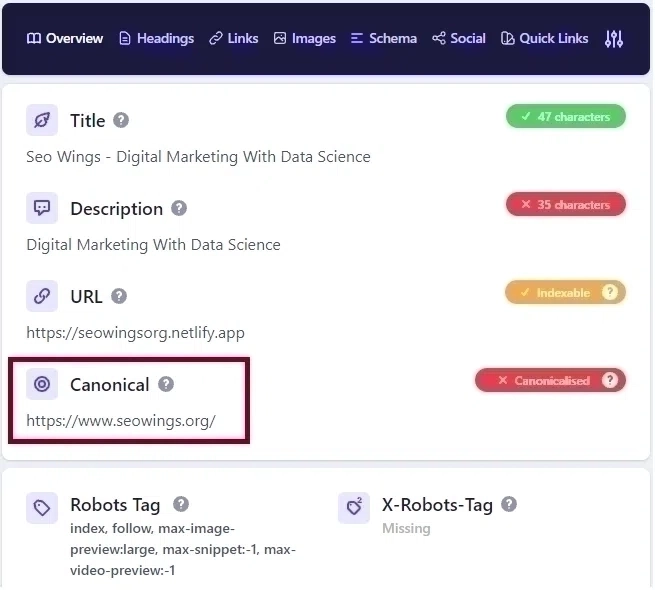
My content is accessible from the Netlify subdomain as well as my main domain? Will this affect my SEO?
No, this is not an issue. Your content is being hosted by the Netlify subdomain as a reference point, and your main content will always be accessible from the main domain. Netlify subdomain has a canonical tag that refers to your main domain.
Netlify subdomain main domain canonical tag [Image Credits: Faisal Shahzad (SEO Wings)]
In the above example, you can see that our website Netlify URL https://seowingsorg.netlify.app is having a canonical tag that points to our home page at https://www.seowings.org/. So there is no issue of duplicate content.
How to fix a 500 error code returned from the Server?
Sometimes your server will return a 500 error code, as shown in the image below. In most cases, you can fix it by generating your website again. You can also try extending PHP max_execution_time limit to resolve this issue, although in most cases regenerating the static website is enough.
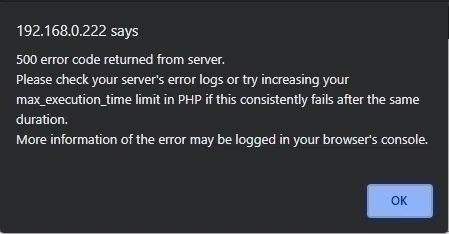
500 Error Code from WP2Static [Image Credits: Faisal Shahzad (SEO Wings)]
How to only Crawl Posts?
WP2Static can take a while to crawl a relatively large website. In order to speed up the crawling, you can do the followings 1. Only crawl indvidual posts 2. Only crawl non-cached posts To do this, you should select appropriate WP2Static options as shown below. Also cross-check your caches options, and they should be enabled to speed up the crawling process.

Faisal Shahzad
Hi, I am Faisal. I am working in the field of Search Engine Optimization (SEO) and Data Sciences since 2002. I love to hack workflows to make life easy for people around me and myself. This blog contains my random thoughts and notes on Digital Marketing, Affiliate Marketing, Static WordPress Hosting with Netlify and CloudFlare Pages, Python, Data Science and open-source projects.


