WordPress Hosting on Netlify Using Simply Static
Static WordPress is the process to converts a static version of WordPress and deploying it as a static website (similar to JAMStack). It has the advantages of a powerful content management system offered by WordPress, resource optimization, and the blazingly fast speed of static websites.
simply-static is a WordPress plugin that helps to convert dynamic WordPress websites into static websites. However, these static WordPress websites require additional post-processing to add missing features, e.g., redirects, forms, search functionalities, and comments. SERP Wings recently launched simply-static-post-process software to easily add these missing features during website deployment.
If you are looking for a video tutorial, then please check out this video where I have explained the complete process of static WordPress hosting using simply-static-post-process software.
Static WordPress Deployment using Simply Static - YouTube Video Opens in New Tab [See Terms and Conditions for 3rd party links.]
Why Simply-Static-Post-Process Software?
A crawled version of a WordPress website generated using Simply-Static WordPress Plugins doesn’t include important information for a website’s functionality. These missing pieces of information are Search functionalities in a website, redirects, 404 Error Pages, Robots.txt File, Form Submission and comments.
simply-static-post-process is an answer to this problem. It fixes these problems by adding static search functionality using Lunr.js, including redirects and 404 pages to the static website version of a WordPress website.
Where to Host WordPress?
Although you will deploy the static version of your WordPress website, you still need to host actual Dynamic WordPress as Content Management System. Plenty of options are available both online in the cloud or on your local host. You can choose between the following options.
WordPress on Localhost
If you want to save the hosting costs completely, you can choose WordPress installation on your local computer. There are dozens of options available, although we recommend using Local WP for this purpose.
This approach makes it difficult to collaborate with others on the same website as the website is being hosted on your local computer. Although localWordPress and several other local WordPress installations offer one-click shareable link so that others can collaborate with you, but it can still be difficult for newbies to set up collaborative behaviors on local WordPress installation.
This method is much more secure as you are not sharing/replying to any online resource. However, setting up database backups and antivirus by yourself would be best. Please consult our detailed tutorial on Hosting on WordPress for more in-depth knowledge.
Paid Hosting on Cloud
You can choose between standard, premium, or share hosting for a paid version. In most cases, you are good with shared hosting, where only a few people will work on WordPress for content collaboration.
You can look into shared hosting offered by many service providers, e.g., Namecheap, Godaddy, etc. Since you do not need dedicated bandwidth and other computing resources as your traffic is diverted to the static version of your website. Any standard cheap and local shared cloud hosting will also work in this situation.
If you are no big websites where dozens/hundreds of people are working at a given time, then it makes sense to go with paid premium hosting. This approach is ideal for collaborative purposes. You can archive your website with freely available WordPress plugins, e.g., updraft.
Free WordPress Hosting
Alternatively, you can also use a free WordPress hosting solution, which offers custom WordPress installations and the ability to install additional plugins/themes. These are also cloud hostings but are generously provided by hosting companies. One such service is pantheon.io which is regularly used by the SEOWings team.
You can give pantheon.io a try, or you can also look for any other free WordPress hosting solutions. It is ideal for small website developers who want to test their things. They can create additional users on their WordPress website for collaboration purposes. Backups are also possible with the help of updraft or similar plugins.
Step By Step Workflow for Static WordPress Hosting on Netlify
We have created a step-by-step procedure to link your Dynamic WordPress Website (hosted on paid or free servers, e.g., Pantheon) with Netlify.
You will need to create a Netlify account (for actual static WordPress hosting), a GitHub account (for post-processing software), and, optionally pantheon.io free account (you can use any service of your choice for this purpose). Deploying Static WordPress on Netlify can fail if something goes wrong or you miss a step.
For the rest of this tutorial, we will use the freely hosted WordPress website on pantheon.io (https://dev-staticwordpress.pantheonsite.io/). We will deploy it to the static-wordpress-com.netlify.app.Later on, we will demonstrate the custom domain addition on netlify using staticwordpress.com domain as an example.
Overview of the Workflow
Static WordPress Deployment Workflow using simply-static is a 9 step process, which uses several open-source software components to successfully deploy WordPress websites on Netlify. These steps are
simply-staticWordPress triggers a crawl process on WordPress Website.- WordPress confirms generating a crawled website version as a zip archive.
simply-staticsend zip archive and associated information tosimply-static-netlify-callbackwordpress plugin.simply-static-netlify-callbackuses netlify webhooks to transmit and deploy information and trigger the deployment process.- Netlify connects with Github to access the latest version of
simply-static-post-process. - Github initiates the post-processing with
simply-static-post-process simply-static-post-processsend the post-processed version of the static WordPress website to netlify.- Netlify sends updates to the
netlify-statuswordpress plugin about the build and deploy process. - deploy/build status is constantly updated on the WordPress backend website.
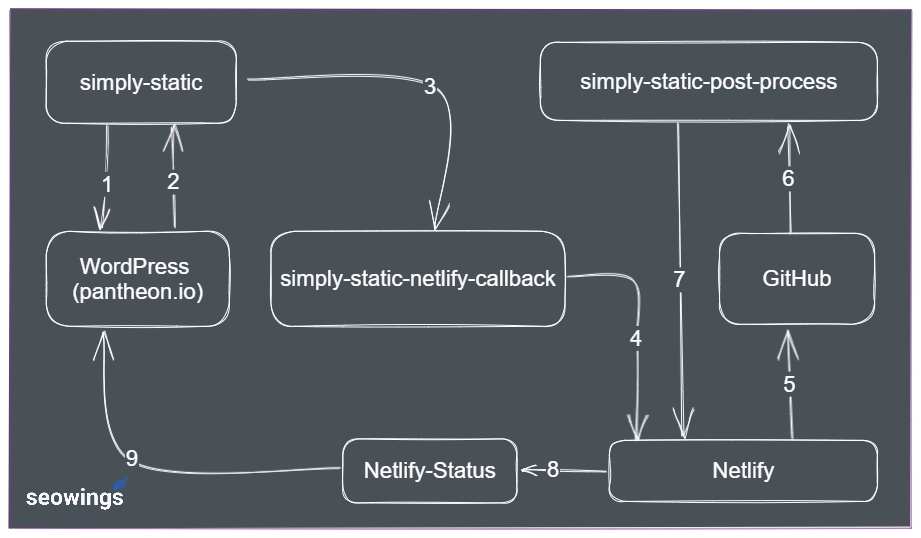
Simply Static WordPress Deployment Workflow for Netlify [Image Credits: Faisal Shahzad (SEO Wings)]
Setup GitHub Account
Create a new one if you still need to get a GitHub account. Click on the Sign Up button in the top right corner. Please follow their signup wizard to create a new account. You will need to specify your email address and some basic information about the intention of using Github. You can also skip some of the configurations. By signing up, you follow their “Terms and Conditions” to host your code on their servers.
You might ask yourself, “Why Github and not any other Git Service Provoider e.g. Gitlab, Bitbucket, etc.”. You can choose any other service provider. Still, as per our experience, we have found GitHub free account to be more valuable (free perks) without providing Credit Card details. We discussed the advantages in another blog post.
You can go to SERP Wings GitHub Home Page where you will find links to all required repositories. If you are new to GitHub, browse the GitHub page to get comfortable with it. Feel free to open source codes of SERP Wing repositories. You will see a screen similar to the following. We will use all three repositories highlighted in red color.
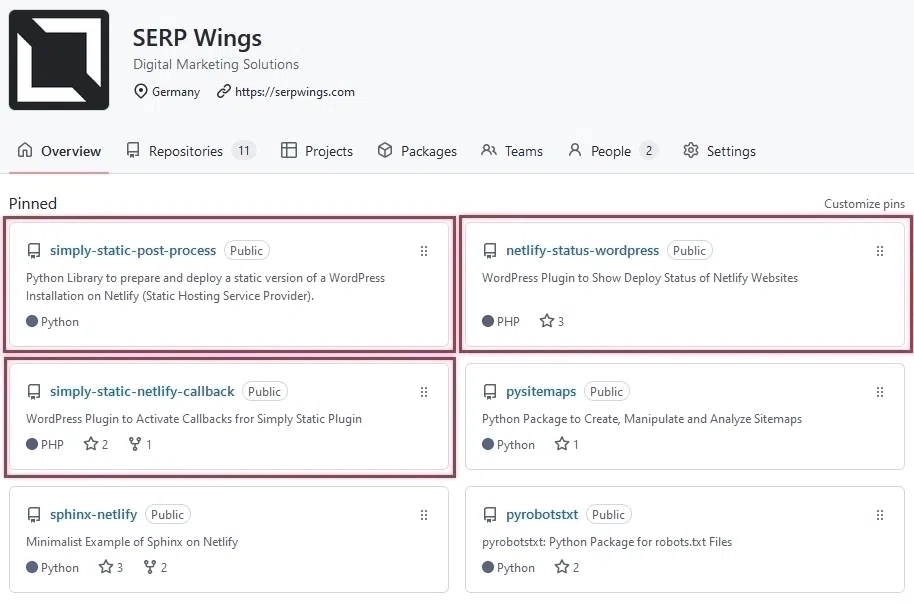
SERP Wings GitHub Home Page [Image Credits: Faisal Shahzad (SEO Wings)]
Fork static-wrodpress-post-process
Once your GitHub account is set up and your email address is validated, you are ready to start using your GitHub account. Now go to SERP Wings simply-static-post-process repository page.
Now click on the Fork button (top right side of the page) to make a copy of simply-static-post-process software. Also click on the Star button to show your support for this project.

Fork Button on Top Right Side of the GitHub Repository Page [Image Credits: Faisal Shahzad (SEO Wings)]
This will start forking the repository. Now click on Create Fork.
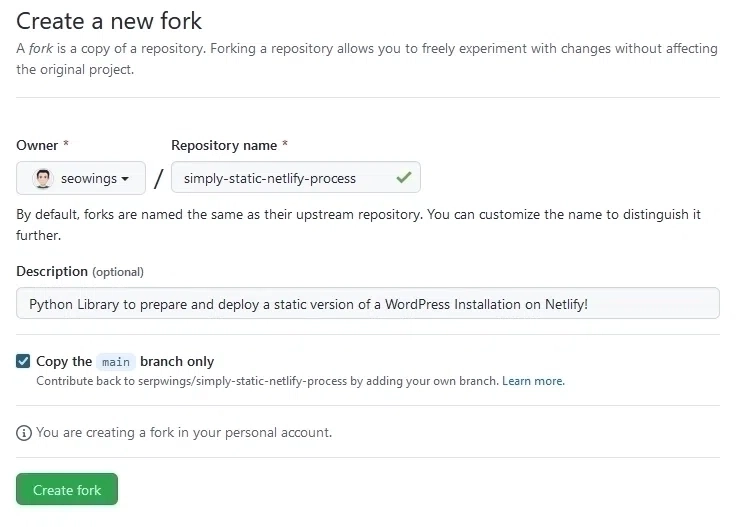
Create a fork of static-wrodpress-post-process Repository on GitHub [Image Credits: Faisal Shahzad (SEO Wings)]
Alternatively, you can create a new repository and import this repository as private or public. I recommend keeping a fork of the repository because this has several advantages.
- Because the update is easy- Once we update (new features, bug fixes, etc.), you can update your repository with a single click (you will see the sync fork button). In the case of a private repository, you will not be able to use this feature, and you need to update it manually. You might break your installation if you are not a Git user.
- No private information (about a person, website, or project) is saved in the repo. So it is safe to fork it and keep it public. We will only use this software to execute commands.
- If you make any new feature/bug fixes to the
simply-static-post-processrepository, you can create a pull request and collaborate with us quickly.
Setup Netlify Account
To host a static WordPress website on Netlify, first, we need to create an account on their website. Netlify offers several methods to create an account.
You can signup on to their website using your email/password. However, they also offer the 3rd Part auth to create an account. Currently, they offer OAuth using Github, Gitlab, Bitbucket and MS Azure. Since we have already created a GitHub account, it is recommended to use your GitHub account for login.
If you use the email/password option, you still need to link Netlify to your GitHub account when using “simply-static-post-process” software. So why not do both with a single click, i.e., when you log in via GitHub, your Netlify is already linked with your GitHub account, and no extra linking is required?
Deploy a Static Website on Netlify
In the next step, deploy a static website on Netlify. You can link with your recently forked simply-static-post-process repository on GitHub.
- Click on
Add New Siteand then onImport an existing project.
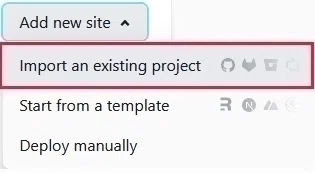
Netlify- Select Import an existing project to get started [Image Credits: Faisal Shahzad (SEO Wings)]
- Now, click on
GitHub Icon. If your Netlify account is configured with GitHub, you will not see any error, and Netlify will list all available repositories. If you cannot find your recently forkedsimply-static-post-processrepository, type it in the search box, and netlify will list it.
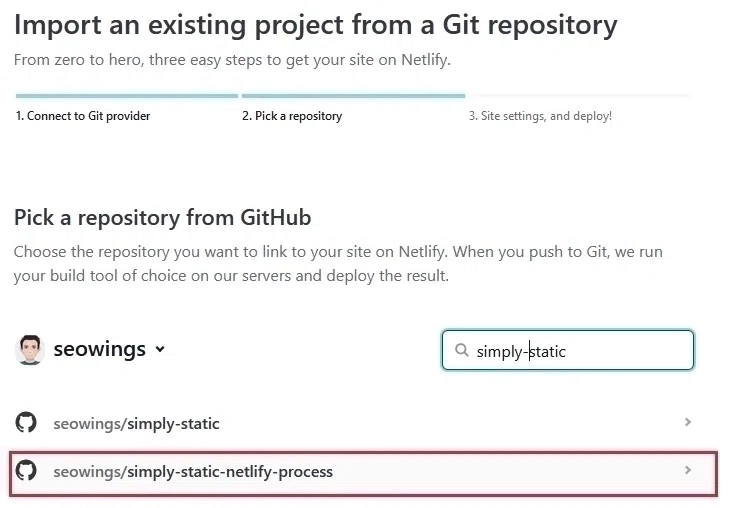
Netlify- Select simply-static-post-process Repository [Image Credits: Faisal Shahzad (SEO Wings)]
-
Click on
simply-static-post-process. This repository has basic configurations, so you only need to clickDeploybutton.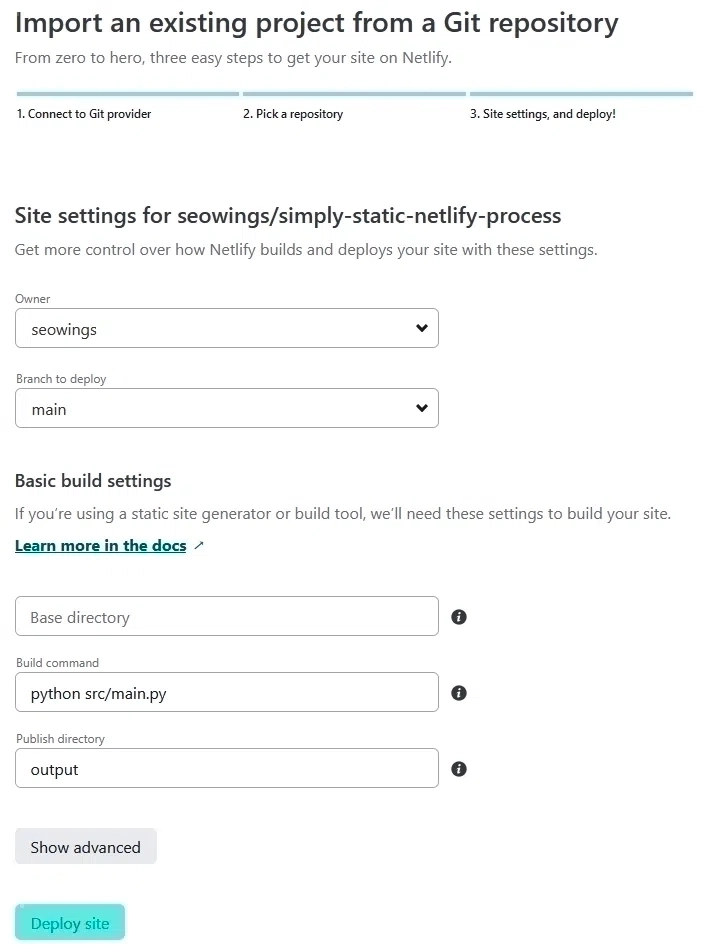
Configure simply-static-post process repository with Netlfiy [Image Credits: Faisal Shahzad (SEO Wings)]
-
Netlify will run
simply-static-post-processand deploy your website. Dont worry. This deployment will fail as we still need to do some additional configurations.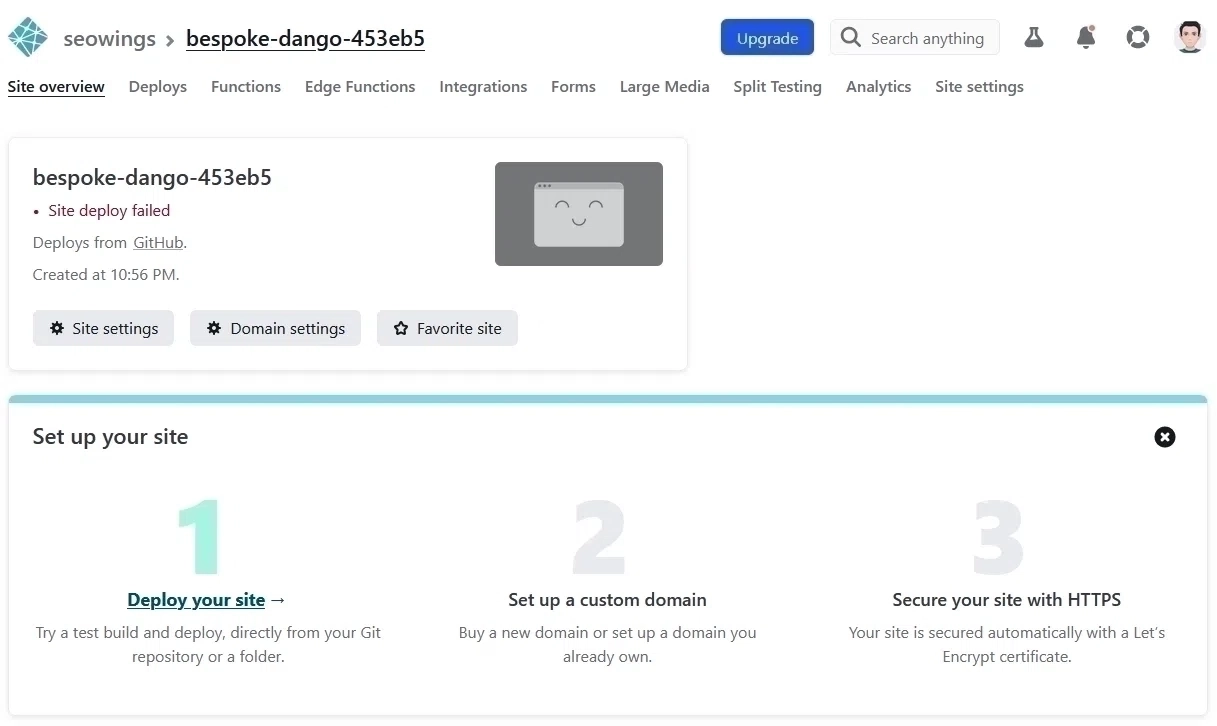
First failed to deploy on Netlfiy. It will fail as we do not yet have any WordPress website linked with it [Image Credits: Faisal Shahzad (SEO Wings)]
Change Site Name
Netlify will deploy your static website with a random name. These names could be confusing if you deploy multiple websites on the same Netlify account. We recommend changing the website name by clicking on General-> Site Details -> Change site name. Now change it to your desired name. For this tutorial, we will use static-wordpress-com as the site name, as this is the name of our website/project.
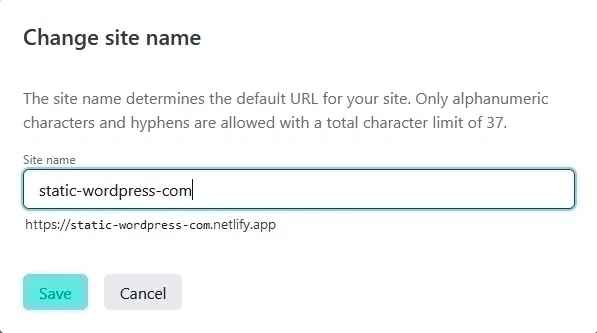
Changing your netlify static website name to a meaninful name can help you to remember when required. [Image Credits: Faisal Shahzad (SEO Wings)]
Although this step is optional, using a meaningful website name that reflects your project is recommended. So, if you are hosting your static WordPress website on “example-com,” use example.com as a netlify website name.
Create a Netlify Build Hook
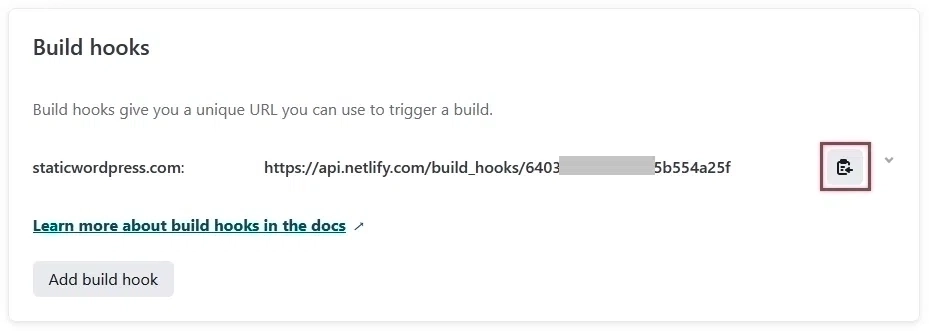
Now click the build and deploy menu and scroll down to Build hooks. Now click on Add build hook to create a new hook used to start post-processing of simply static zip files.
Here, it would help if you gave a meaningful name to your hook. A good name would be your dynamics WordPress website host name. Also, choose the main branch as deploy. If you are using localWordPress, then example.local, dev-staticwordpress.pantheonsite.io or staticwordpress.com for WordPress website hosted for free on pantheon.
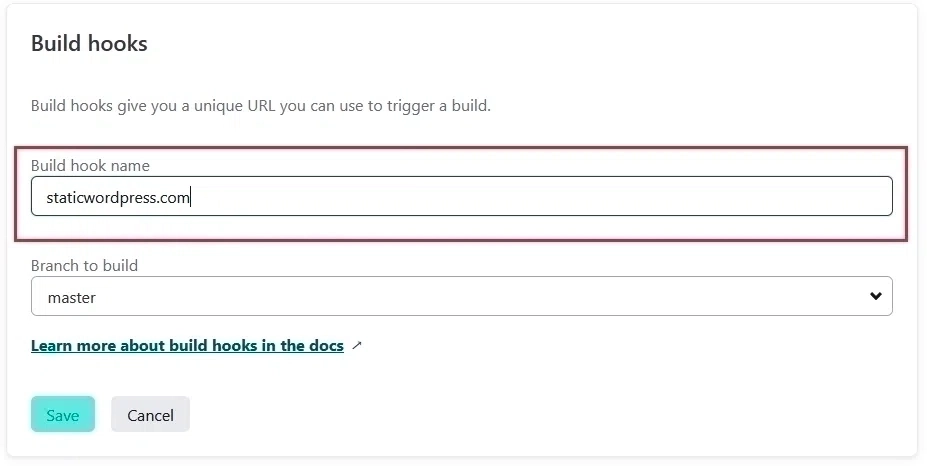
How to create Netlfiy build hook? [Image Credits: Faisal Shahzad (SEO Wings)]
Now save this unique Build Hook and handle it like a password. Please do not share it with anyone, as anyone with this link can trigger a deployment for your Netlify website, which can consume your free build minutes (currently free plan includes 300 minutes).
Tweak Website Deploy Settings
Optionally you need to do some minor tweaking on your deployed website for better security and avoid unnecessary website builds to save free build minutes available from Netlify. Most of these settings are available on the Deploy menu.
- Set the
production branchto bemain. Disable branch deployed by selectingNoneto avoid any branch deploys. -
Set
Deploy PreviewstoNoneto avoid any deploy previews triggered using Pull requests again branches.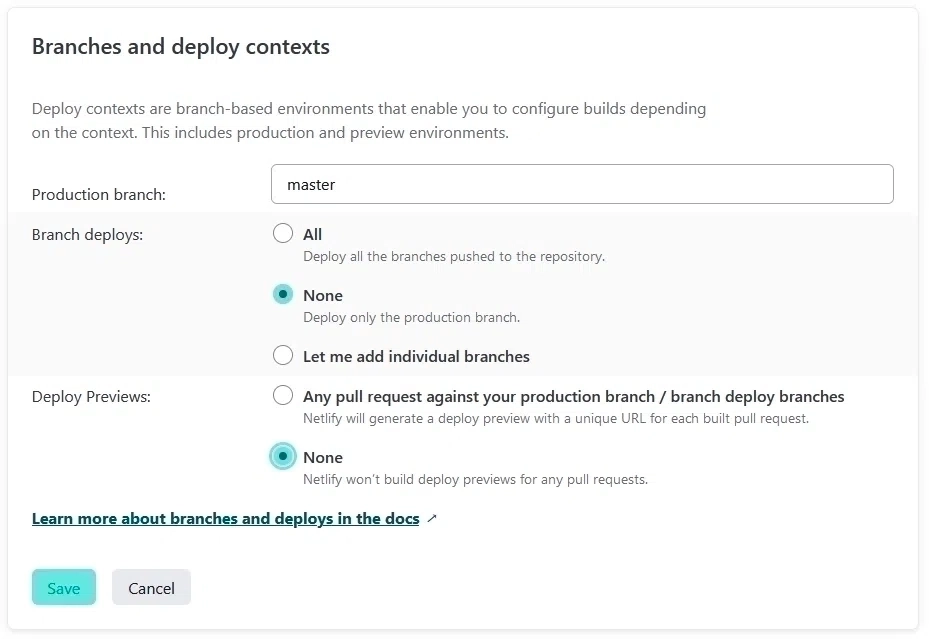
Netlify disable deploy on branch preview [Image Credits: Faisal Shahzad (SEO Wings)]
-
Enable
Assets optimizationif you want to use this feature. It will optimize URLs, CSS, JS, and image files and improve your Lighthouse score and overall improvement on page speed.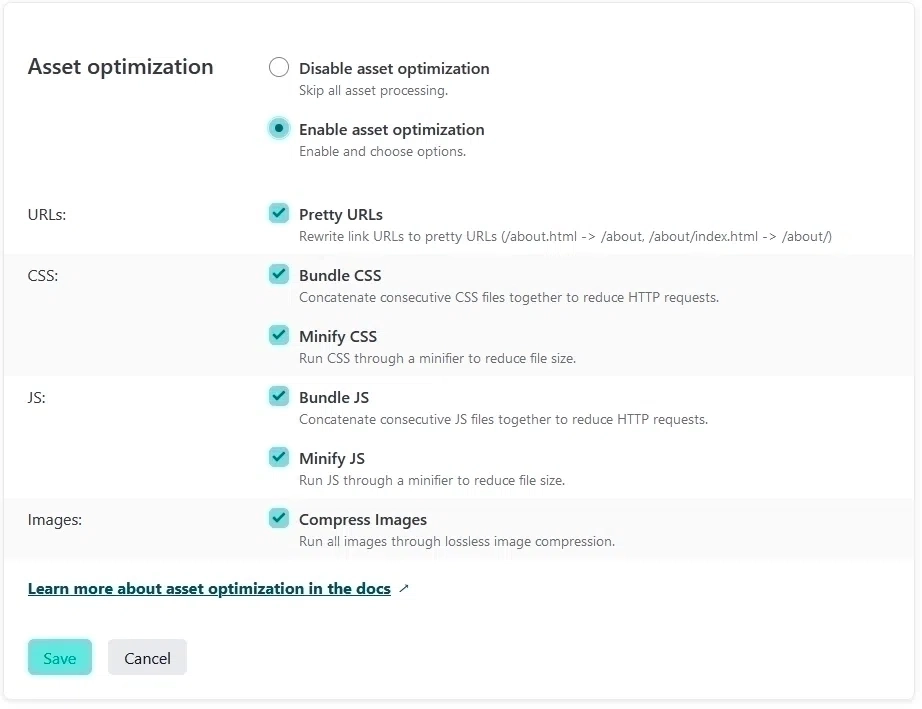
Netlify Assets Optimization [Image Credits: Faisal Shahzad (SEO Wings)]
-
You can set up prerendering on Netlify as it will be helpful for some WordPress themes. Click on
Enable prerenderingwith the Netlify checkbox to enable it.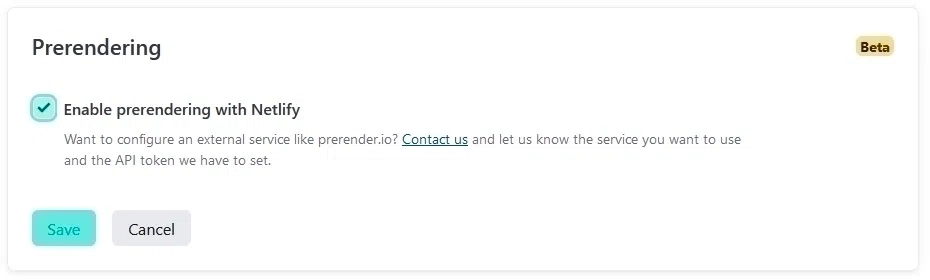
Netlify Pre-rendering [Image Credits: Faisal Shahzad (SEO Wings)]
-
You can leave deploy notifications to default. However, feel free to enable/disable notifications as per your requirements.
- Netlify will automatically detect the form available on your static website. The form embedding method is explained in the next section (WordPress Setup/Contact Us) for creating additional pages. You can further tweak the form submission to be forwarded to a desired email address.
- One of the best features is using GitHub repository branches for Split (A/B) testing. This testing is not in the scope of this tutorial and is discussed in a separate blog post.
WordPress Backend Setup
After Netlify and GitHub accounts are in place, it’s time to prepare for WordPress installation. As mentioned earlier, we will use free WordPress hosting from pantheon.io for this blog. We will use freely hosted https://dev-staticwordpress.pantheonsite.io/ for this purpose. Feel free to use any other option available to you.
This tutorial assumes that you have a working installation of WordPress with desired themes and plugins installed.
Create Additional Pages
Since we will be deploying a static version of our WordPress, we need additional pages to store some data for post-processing. This data is only for post-processing as the standard simply-static plugin will not collect them from the WordPress database, so we must manually create them.
Before we can deploy a static version of the WordPress website, the following additional pages are required. Dont worry these pages will be removed from your final static WordPress website as we will remove them from the final deployment during the post process.
1- 404-Error Page
WordPress has built-in support for 404/410 and other error pages. However, it is impossible to crawl a copy of these pages due to technical reasons and how the simply-static WordPress plugin works.
Hence, you should create a new page on WordPress installation. Please give it a suitable title, e.g., 404 Error, and add the usual information per your requirement. Save this page as 404-error (only use this slug/URL and do not use any other name).
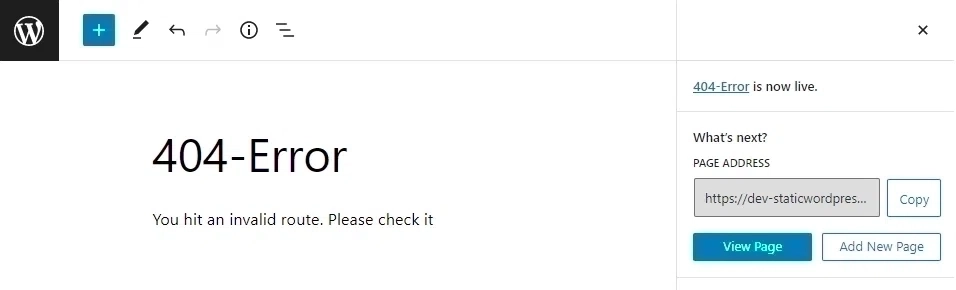
Sample 404 Error Page [Image Credits: Faisal Shahzad (SEO Wings)]
2. Search Page
Static WordPress does not include dynamic search functionality as in standard WordPress installation. So a static search functionality needs to be included in a deployed version. simply-static-post-process uses Lunr.js to build static search indices, which are later available for search.
<section class="search-results hide-element">
    <form id="search-form" name="searchForm" role="form" onsubmit="return false">
        <div class="search-wrapper">
            <div class="search-container">
                <i class="fa fa-search"></i>
                <input autocomplete="off" placeholder="Enter Search term" size="30" id="search" class="search-input" aria-label="Search site" type="text" name="q">
                <button type="submit" class="fa-search">
                    <div>Search</div>
                </button>
                <button id="clear-search-results-mobile" class="button clear-search-results">Clear Results</button>
            </div>
            <div class="search-error hide-element"><span class="search-error-message"></span></div>
        </div>
    </form>
    <div id="search-header">
        <div class="search-query search-query-left" style="margin-top: 15px;">
            <h4><span class="underline--magical" id="query"></span></h4>
        </div>
        <div class="search-query search-query-right"><span id="results-count"></span><span id="results-count-text"></span></div>
    </div>
    <ul></ul>
</section>
Create a “Search” page on WordPress installation to use the search functionality. Now create an HTML element on this page with the following code (copy this code and paste it on WordPress). Save and publish this page as “search.”
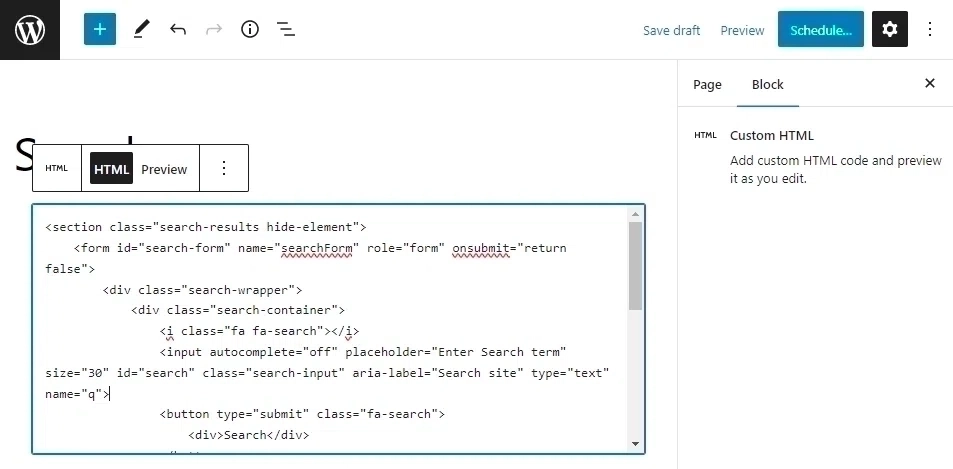
Search Page which will also display search results using Lunr.js [Image Credits: Faisal Shahzad (SEO Wings)]
3. Redirects Page
One of the core and often used features of WordPress is the possibility of redirecting pages to internal and external pages. Since static WordPress works differently than the standard installation, users must create a new page, “redirects,” on their WordPress installation.
Paste the following HTML table on the newly created page and save/publish this page with the “redirect” slug.
<table>
    <tbody>
        <tr>
            <td>from</td>
            <td>to</td>
            <td>code</td>
            <td>use</td>
        </tr>
        <tr>
            <td>/home</td>
            <td>https://www.google.com</td>
            <td>301</td>
            <td>1</td>
        </tr>
    </tbody>
</table>
This table has four columns, and you can fill them as needed. Column descriptions are as follows.
- from: Column represent those slog which you want to redirect. For example, testwesbite.com/goto
- to: Column represents values where you want to redirect your user, e.g., to testwebsite.com/home or google.com
- Code: Redirect/status code you want to transmit with the redirect, e.g., 301, 404, or 200.
- Use: This column can have two values, 1 or 0. 1 means that use this redirect, and 0 means deactivate the redirect.
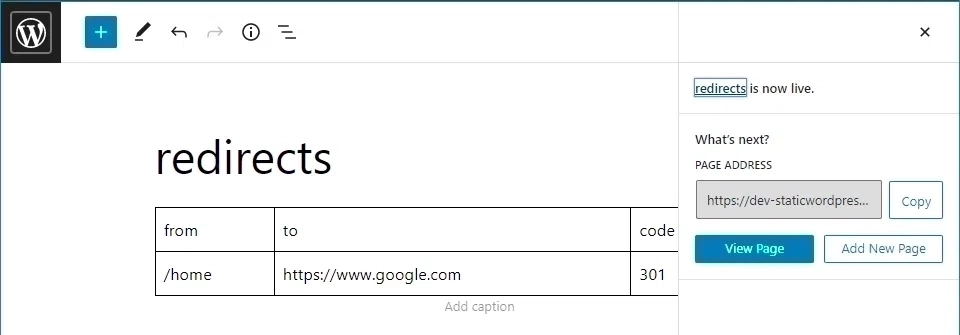
Redirects Page which will contain desired redirects [Image Credits: Faisal Shahzad (SEO Wings)]
Above mentioned HTML code will generate a sample redirect from the /home slug to https://www.google.com. So every time we call static-wordpress-com.netlify.app/home/, we will be redirected to google.com. You can edit these redirects as per your requirements. The WordPress table editor is great for adding new rows. So every time you want to add a new redirect, add a new line and a desired redirect.
4. Contact Us Page
Netlify has built-in support for forms. They offer 100 forms submission monthly for free, enough for a normal user to contact their visitors. Please create a new page, “Contact Us,” and use a form like this, as shown below.
<form name="contactForm" method="POST" data-Netlify="true" action="/thank-you/">
  <p>
    <label>Full Name: <input type="text" name="name"></label>
  </p>
  <p>
    <label>Email Address: <input type="email" name="email"></label>
  </p>
  <p>
    <label>Your Message: <textarea name="message"></textarea></label>
  </p>
  <p>
    <button type="submit">Submit</button>
  </p>
</form>
Feel free to modify this code. However, ensure that it has a field data-Netlify=”true” and an action=”/thank-you/.” Also, create a thank-you page with a thank-you slug to redirect users once they have submitted a form.
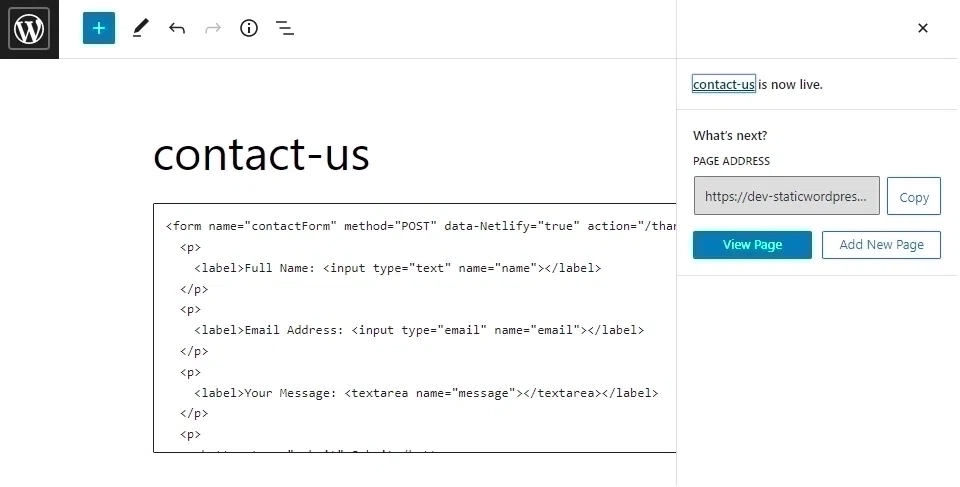
Contact Us Page with Netlify Forms [Image Credits: Faisal Shahzad (SEO Wings)]
5. robots-txt Page
You can also create a page “robots-txt” on WordPress installation. It is optional, and if this page doesn’t exist, then a robots.txt with the following content will be created during the post-processing.
User-agent: *

Disallow: /WordPress-admin/

Allow: /WordPress-admin/admin-ajax.php
However, you can create a table on your website where each row represents robots.txt file content. Post Processing algorithm will parse them and generate an up-to-date robots.txt file. You can create this table in Excel or any other spreadsheet software and then paste it into your robots-txt page. The final page should look like the following.
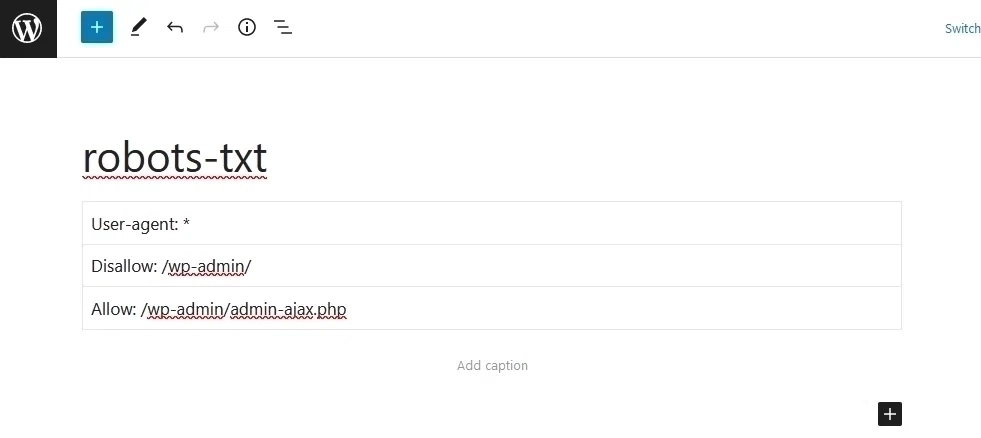
Example Robots.txt File as a Table [Image Credits: Faisal Shahzad (SEO Wings)]
6. Comments
Static WordPress will also lack commenting system from standard WordPress installation. To overcome this issue, you can use any off-the-shelf commenting system, e.g., Disqus. A user can use their plugin to configure them on the website. Here is a list of commenting systems for Static WordPress websites.
- Disqus
- Static Man
- Isso
- Google Sheets
Another blog post has discussed a more detailed overview of this commenting system. You can consult it to get more information.
Install Simply Static Plugin
A user needs to install the simply-static plugin from the WordPress plugin directory. For this, go to Pluings-> Add new -> and search for simply static in the WordPress plugin directory. It will appear as a plugin from Patrik Posner, as shown below. Install this plugin and activate it.
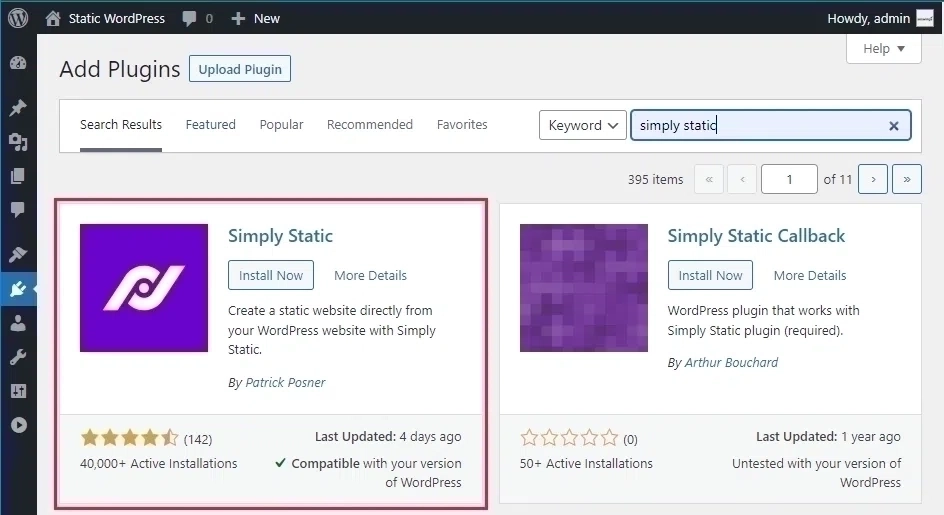
Install Simply Static Plugin [Image Credits: Faisal Shahzad (SEO Wings)]
Now click the simply-static Plugin icon on the left menu and then settings. Change the following settings.
-
Enter your website URL. If you are using a custom domain name, then enter it here. Enter your primary domain name (with or without www). You will see this on Netlify domain management. In case you are not using a custom domain, then just past your netlfiy.app website URL here. Make sure that your pasted URL does not contain
HTTPS. SelectHTTPSfrom the drop-down list, as the SSL certificate is already configured in Netlify. -
Select ZIP Archive as delivery method.
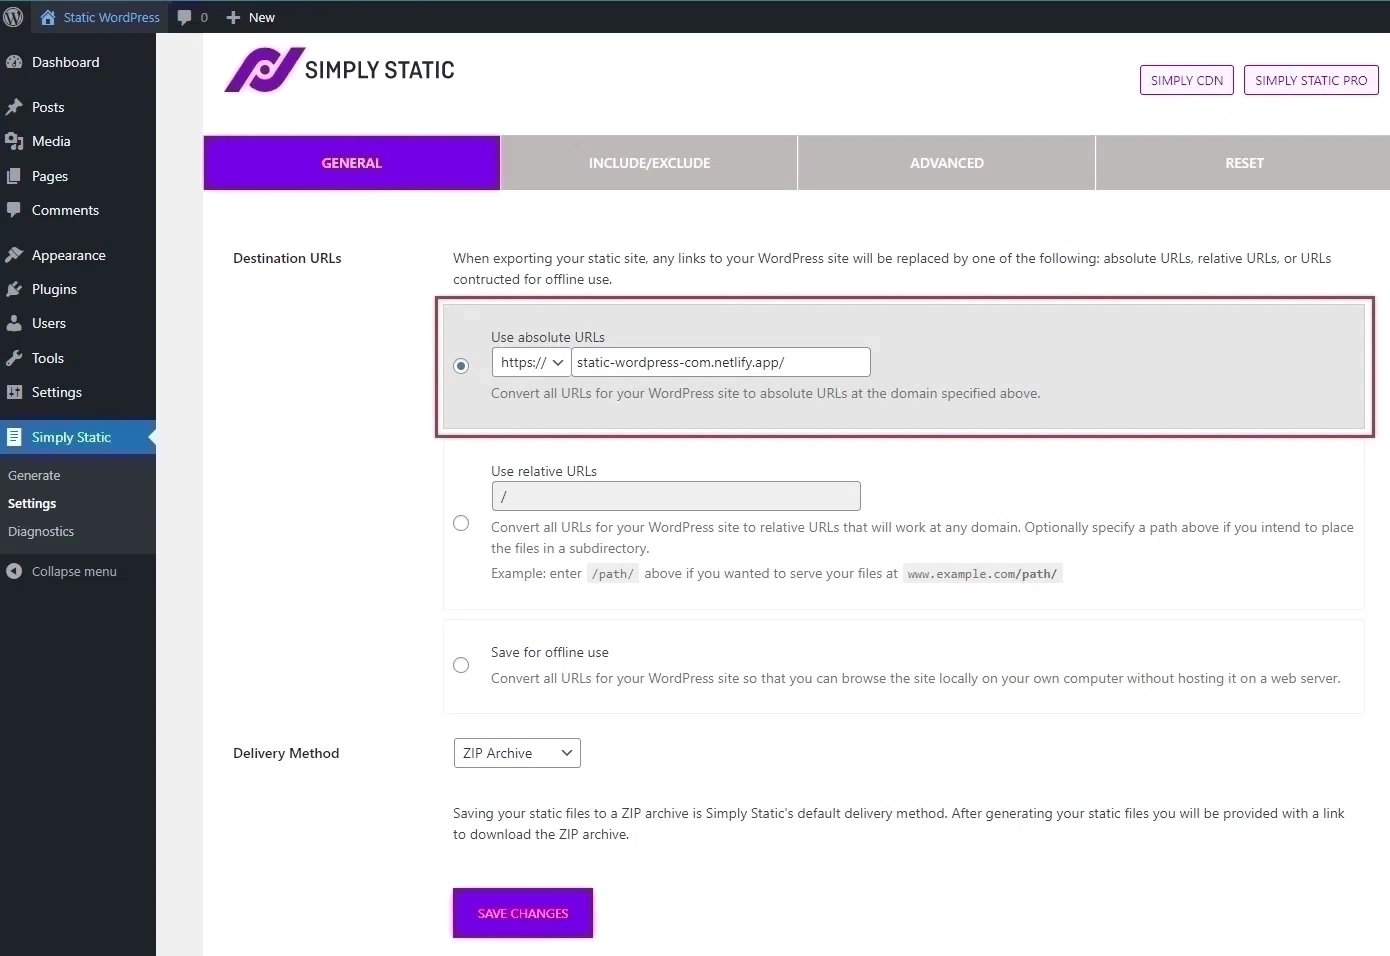
Simply Static Add Destination URL [Image Credits: Faisal Shahzad (SEO Wings)]
- Enter the following additional crawl pages in the additional setting tab. We created the pages in the last step (WordPress Setup). These pages will include pantheon (on any other server) address in them, e.g.,
https://dev-staticwordpress.pantheonsite.io/WordPress-sitemap.xml. Ensure all pages start with the same domain name, i.e.,dev-staticwordpress.pantheonsite.ioor any other chosen domain name.
https://dev-staticwordpress.pantheonsite.io/404-error/
https://dev-staticwordpress.pantheonsite.io/redirects/
https://dev-staticwordpress.pantheonsite.io/search/
https://dev-staticwordpress.pantheonsite.io/robots/
https://dev-staticwordpress.pantheonsite.io/sitemap_index.xml
https://dev-staticwordpress.pantheonsite.io/main-sitemap.xsl
https://dev-staticwordpress.pantheonsite.io/WordPress-content/plugins/wordpress-seo/css/main-sitemap.xsl
https://dev-staticwordpress.pantheonsite.io/favicon.ico
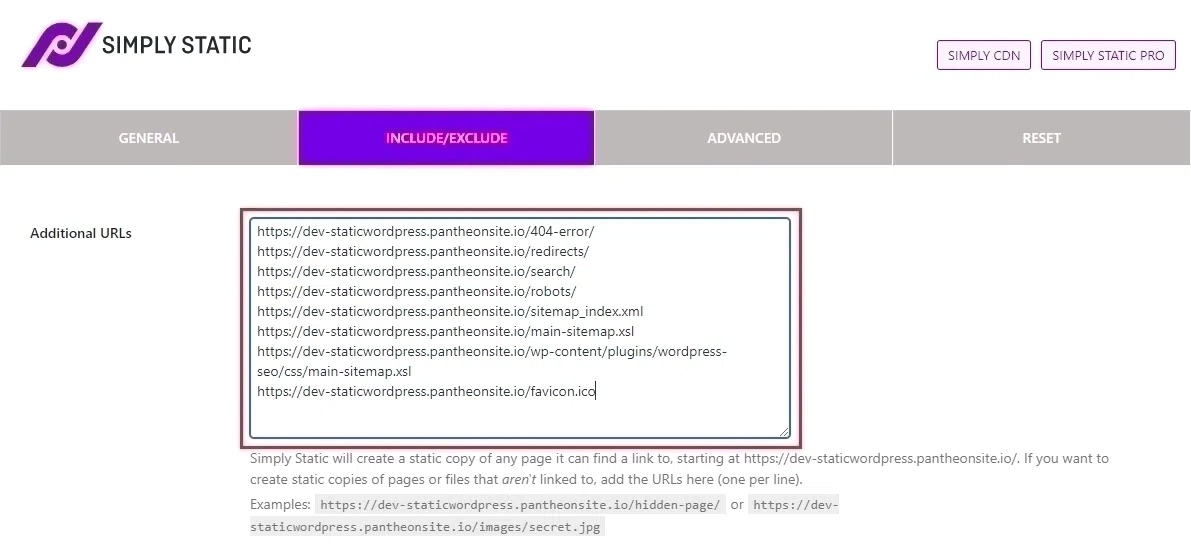
Crawl Additional Pages With Simply Static [Image Credits: Faisal Shahzad (SEO Wings)]
- Now, go to Generate page of the simply-static plugin and generate your site for this first. This is a test generation to ensure the generation process works fine.
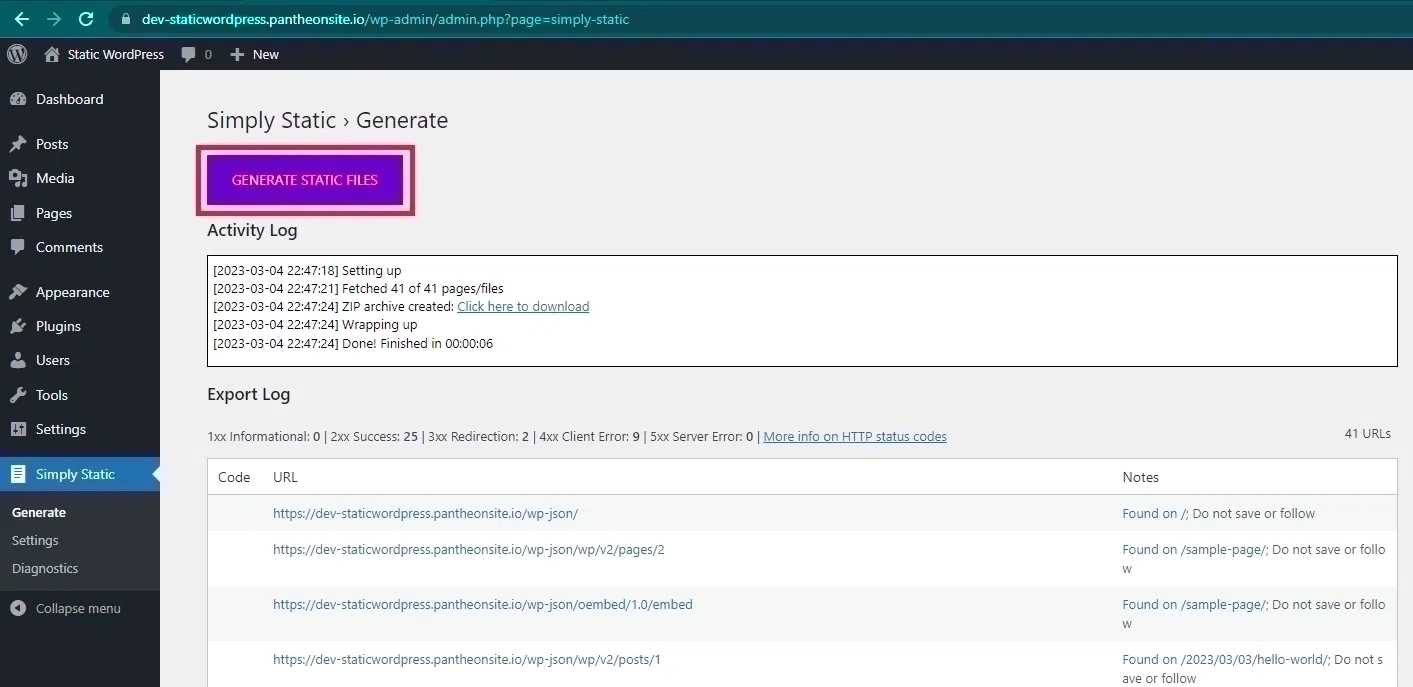
Simply Static Genereate Button [Image Credits: Faisal Shahzad (SEO Wings)]
Simply-static will go through the whole WordPress website and generate a zip file. There are fewer chances that you might get an error at this point. If so, look at the error codes and fix them before proceeding.
Install simply-static Netlify Callback Plugin
If simply-static could generate a zip file, then your WordPress and simply-static plugins are working fine. Now WordPress needs to be linked with a simply-static-Netlify-callback plugin SERPWings developers have prepared this modified plugin from the original simply-static-callback, available in the WordPress plugin repository. You must use the SERP Wings plugin to deploy your WordPress website to Netlify. The plugin from the main WordPress plugin directory will not work.
First, download this plugin from the serpwings.com website to your local computer. Now to go Plugins-> Add new and upload the downloaded zip file. WordPress will ask you to activate this plugin.
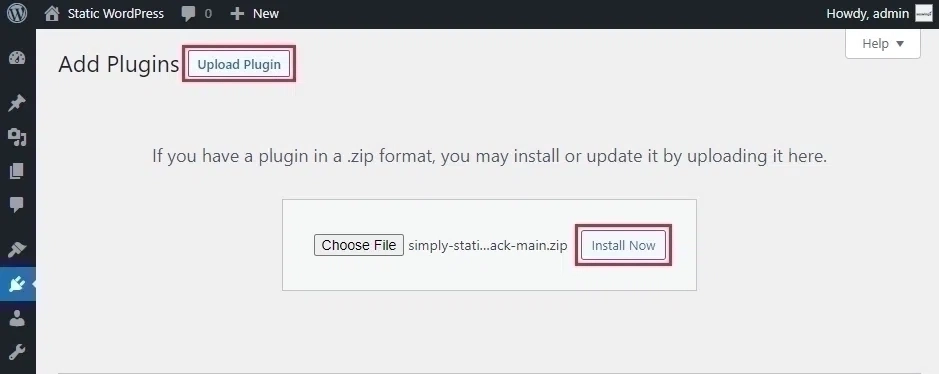
Install simply-static-netlify-callback Plugin [Image Credits: Faisal Shahzad (SEO Wings)]
Activate it, then click the simply-static icon -> Settings in the left menu. Now go to call back settings and do the following.
- Enable Callback by clicking on Checkbox.
-
Then go to your Netlify website and copy the Build Hooks string we created during the Netlify website creation process.
Netlify Build hook Token [Image Credits: Faisal Shahzad (SEO Wings)]
-
Now paste this code into the Callback URL text box.
- Select the Callback request method to POST.
- Now select the Delivery Method check box.
- Also select the following two check boxes for Temporary Files Directory and Generate Archive name
- Set the Deploy URL to your final website name. In our example, we will enter static-wordpress-com.netlify.app in the Deploy URL text box.
- Click on SAVE CHANGES.
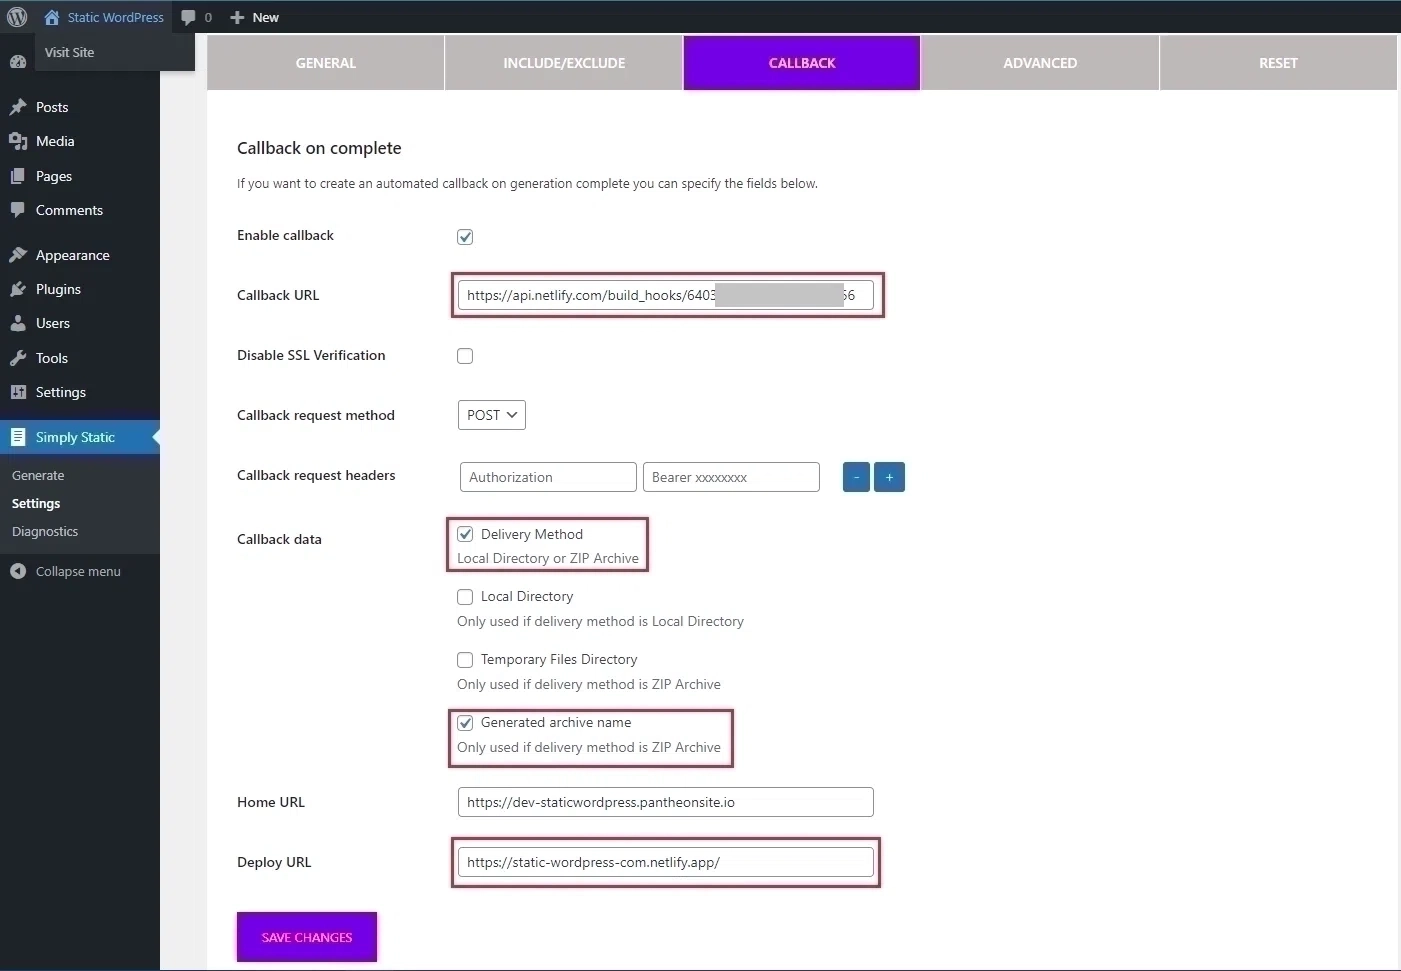
simply-static-netlify-callback Settings [Image Credits: Faisal Shahzad (SEO Wings)]
Install Netlify Status Update Plugin
The last step will link your WordPress website with Netlify callbacks/hooks, but it will not tell you the current status of your netfliy website and if the deployment was successful or failed. To get a status update from Netlify, we need to install the Netlify status plugin.
Go to netlify status plugin page on serpwings.com website and download netlify-status Plugin as a zip file. You also can download it from their GitHub repository.
This WordPress plugin will keep you up to date with your static WordPress deployment status on Netlify. After downloading, click on Plugins-> Add new to install this plugin. Then click upload and upload the zip file. WordPress will ask you to activate the plugin so that you can activate it now.
netlify-status: No deployment found [Image Credits: Faisal Shahzad (SEO Wings)]
On the top right-hand side of your WordPress admin bar, you will see the text “no deplyment found.” Click on it will show a new page where you should specify the netlfiy site id. Now go to your Netlify website, and copy the site id by clicking the copy button.
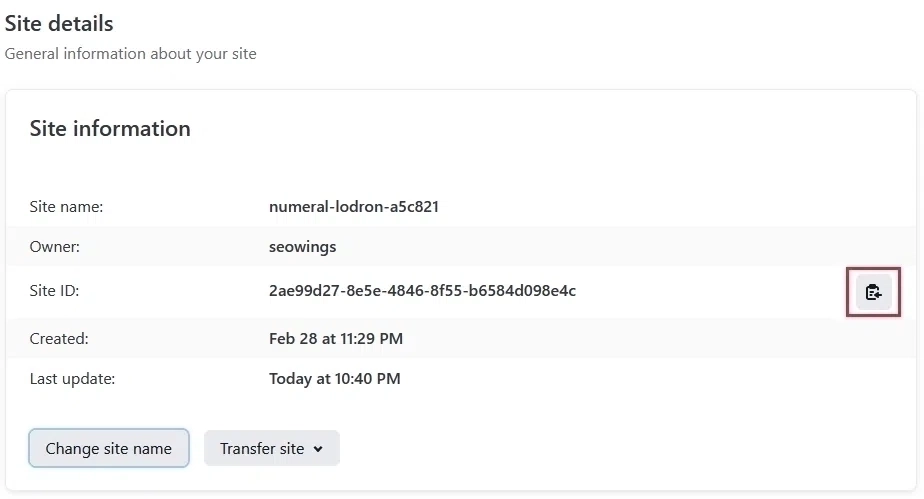
Netlify Site Details to copy Site ID [Image Credits: Faisal Shahzad (SEO Wings)]
Directly paste this site id into the text box shown on the WordPress Netlify status plugin settings page.
netlify-status: Deployement recieving updates [Image Credits: Faisal Shahzad (SEO Wings)]
Now, in the WordPress admin bar, you will start receiving the deployment updates, showing your failed status (this is the last failed build created using the initial deployment process).
WordPress Cache Settings
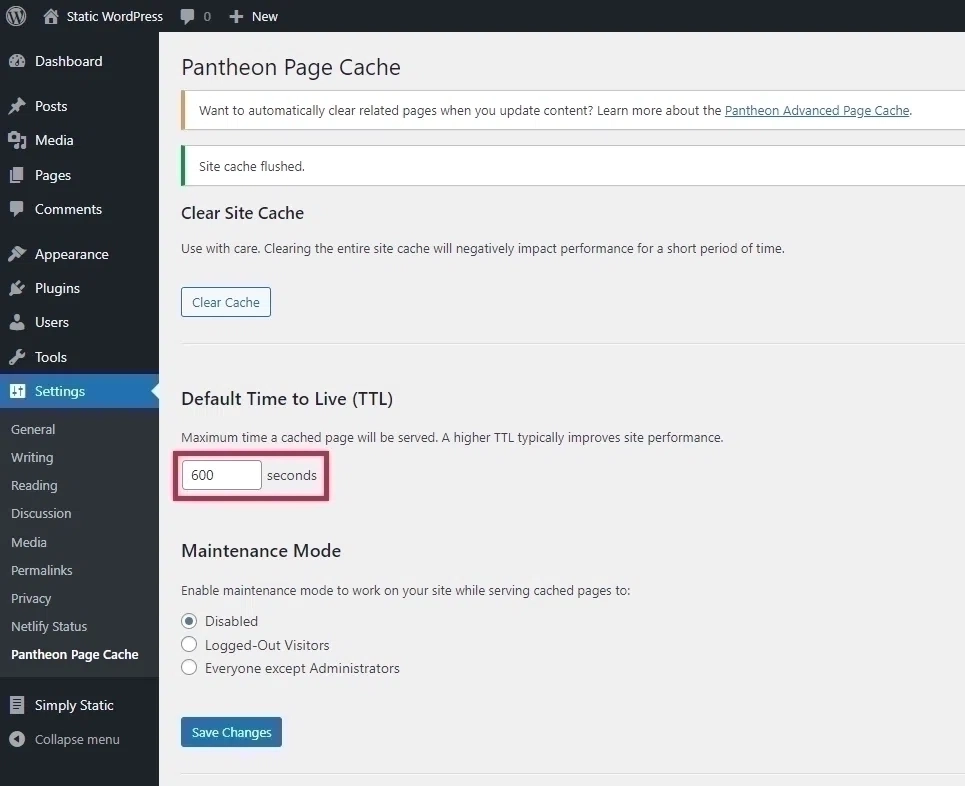
Before the final deployment, you should clear the system/website cache so that an up-to-date version of your website will be crawled. This step is very trivial as if the cache is not cleared, then simply-static might always take the last cached version, which will not include recent posts/changes. You can use any caching plugin for this or ask your hosting to disable this caching.
Pantheon.io Cache Settings [Image Credits: Faisal Shahzad (SEO Wings)]
For our free pantheon hosting, we have cache settings. Go to WordPress settings and then click on pantheon cache. Now set the cache time to “0” seconds so that static will always have a to date version of your website. You can also use additional settings on this page to enable maintenance mode and clear the cache manually.
Configure Maintenance Mode
Your pantheon website is in dev mode, so Google or others will not crawl it. However, you can install maintenance mode, which you can enable when working. Remember, if your maintenance mode is on, then this procedure will not work.
Tip
Turn maintenance mode off when working/generating/deploying your website. Once you are done with deploying, then turn it on.
You can also install any other WordPress plugin for maintenance mode. Just make sure to turn it off when simply-static is generating a new version of your website. Once your website’s new static WordPress version is deployed, you can enable this maintenance mode again.
Generate and Deploy Static Version
After all the above settings, go to a static generate page and click on generate. Simpl-static will crawl your website to create a zip archive of it. The first deployment will take some extra time. Please wait and be patient. It is crucial because if you have a relatively big website, it might take longer to generate a static version.

Sample Netlify Build Status, which will be displayed on top right corner of WordPress Admin Bar [Image Credits: Faisal Shahzad (SEO Wings)]
Once your website is generated, you will start seeing the build/Success status on the top right corner of your pantheon installation. This status will automatically update at a fixed 1500ms interval. So you will see the success/green color button if everything is fine. The static WordPress website should be deployed to worldwide CDNs and ready for you. Opening up your static WordPress website and checking if it is being displayed correctly is recommended.

Sample Netlify Error/Failure Status, which will be displayed on top right corner of WordPress Admin Bar [Image Credits: Faisal Shahzad (SEO Wings)]
If there are errors, we need to check what went wrong. You can log in to your netlffy website page. Click on deploy and check the log files to find the error. Most probably, you have missed a step. Recheck your settings both at Netlify as well as at your dynamic WordPress hosting.
Missing Files and Fonts
Deploying basic WordPress themes and plugins such as Generate Press is simple and should work out of the box for you. However, if you are working with complex themes, e.g., elementor or divi, additional steps might be required as the simply-static plugin will not crawl all files.
Open your static WordPress website and go to the developer mode or your browser (F12 on most browsers). Now click on Console and then start looking for the error. Select all errors and use Ctrl+C to copy them.
Then go to the link extractor online SEO Tool on SERP Wings URL Cleaner website. Then past all the errors in the text box. Also, at the bottom, you need to specify your website domain name in the left text box, i.e., we will put static-wordpress-com.netlify.app in the left text box. On the right text box, you need to put your dynamic WordPress hosting domain name, i.e., dev-staticwordpress.pantheonsite.io. Please do not include https or www in your domain names. Then hit extract, which will extract the links to missing URLs in your simply-static deployment.
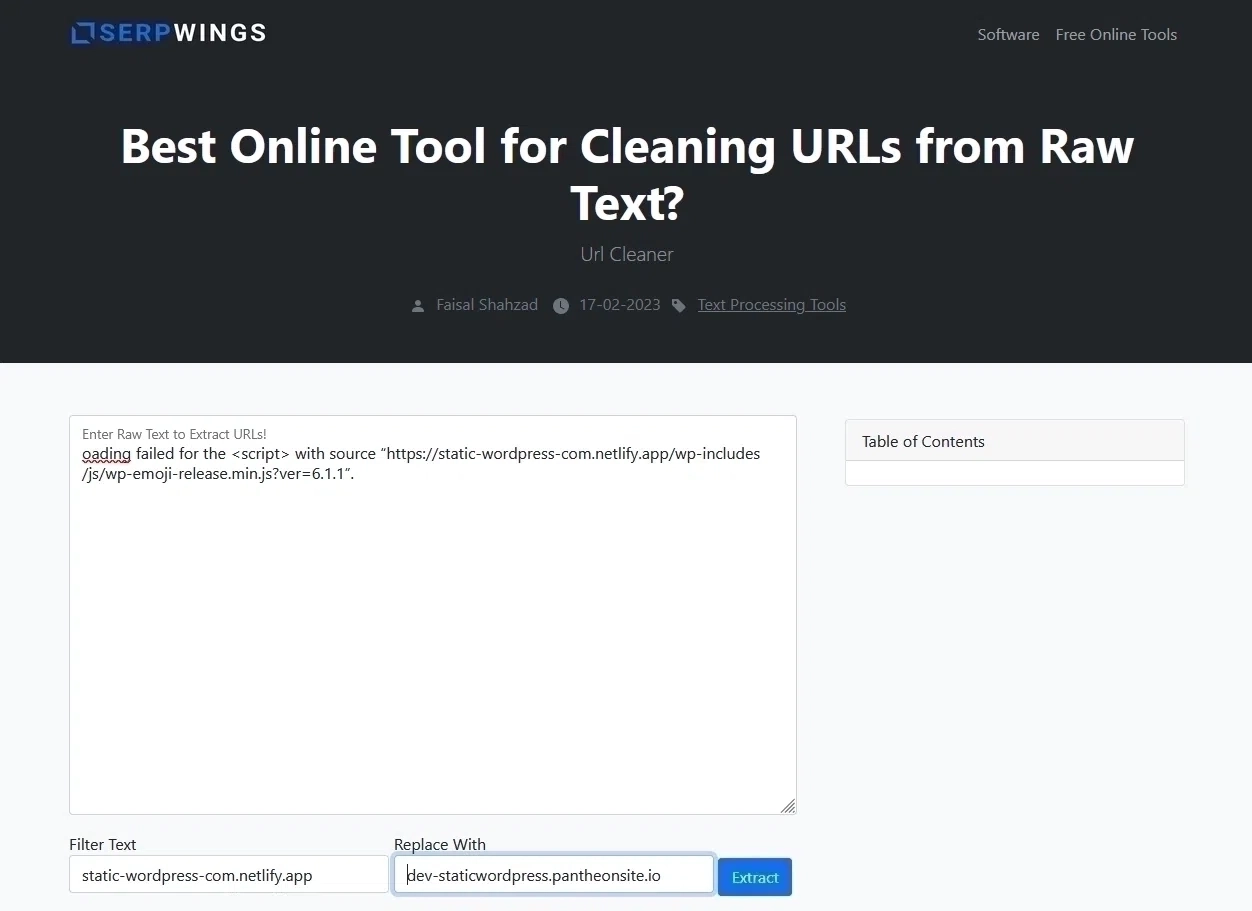
SERP Wings URL Cleaner [Image Credits: Faisal Shahzad (SEO Wings)]
Now copy these missing URLs, go to Simply-Static plugin settings and paste these URLs into the addition pages, and hit the save button. Now go back to the generate process and hit generate button. Now, the simply-static plugin will recrawl your website and deploy it again to Netlify. You will see a green netlfiy status button on the top right corner of the WordPress admin bar.
Custom Domain Name
Your current static WordPress website is hosted on a netlify sub domain. However, you might wish to use your custom domain name. Netlfiy has a build it supports CDN and Domain management. You can transfer your domains from your registrar to Netlify for easy usage with Netlify Websites.
After successfully domain transfer, go to simply-static and simply-static-netlify-callback and replace all URLs containing static-wordpress-com.netlify.app with staticwordpress.com. You will see broken images/links on your next Generate and Deploy if you haven’t changed those URLs.
Domain Name Management
Click on Domain Management; under Production domains, click Add a domain. Netlify will ask you custom domain name. Enter your domain name and click on Verify. Then click on Add domain.
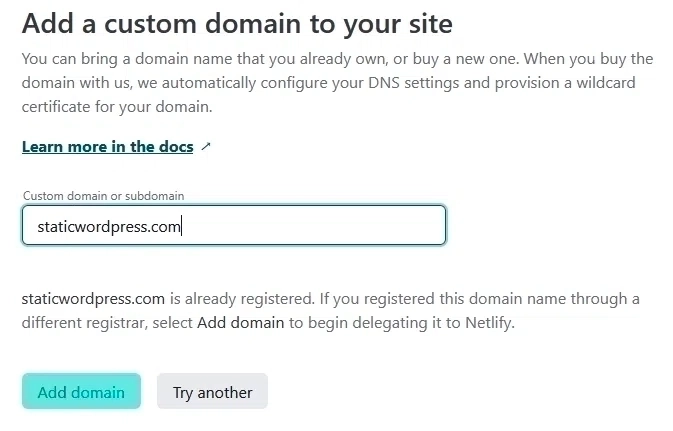
Add Custom Domain Name on Netlify-DNS [Image Credits: Faisal Shahzad (SEO Wings)]
Netlify will redirect you to the Production domains page and is Awaiting for External DNS records to be updated. Now, you have to point the website DNS record at the registrar to Netlify so that Netlify can verify domain ownership.
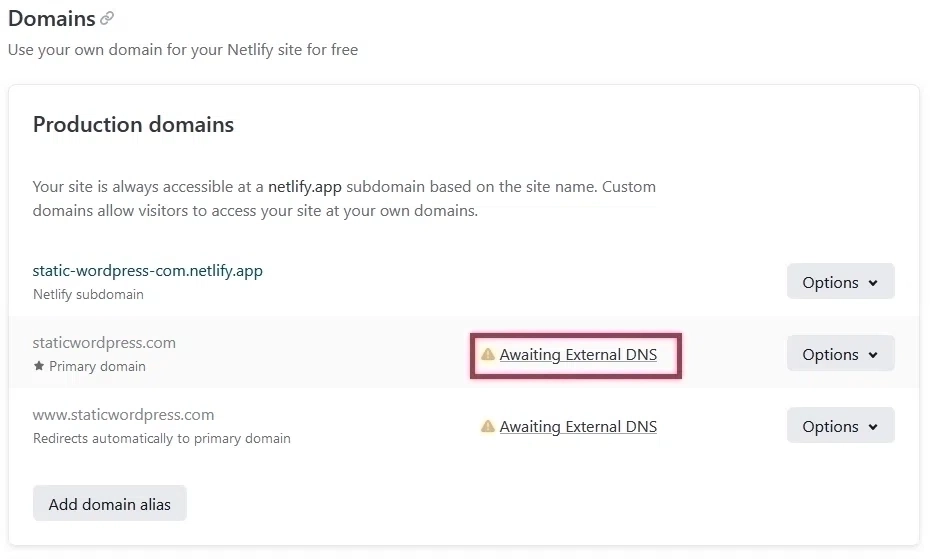
Custom Domain Overview [Image Credits: Faisal Shahzad (SEO Wings)]
There are two options available.
- You can add flat CNAME or A record on your registrar. It could also be Cloudflare (if you already use it for DNS management). Click on “Awaiting for External DNS” and find the values for CNAME and A records. Add them to the appropriate location. DNS management of
staticwordpress.comis being done by Cloud flare, so we will add a CNAME and A record on Cloudflare so that the domain is pointing to our netlify website.
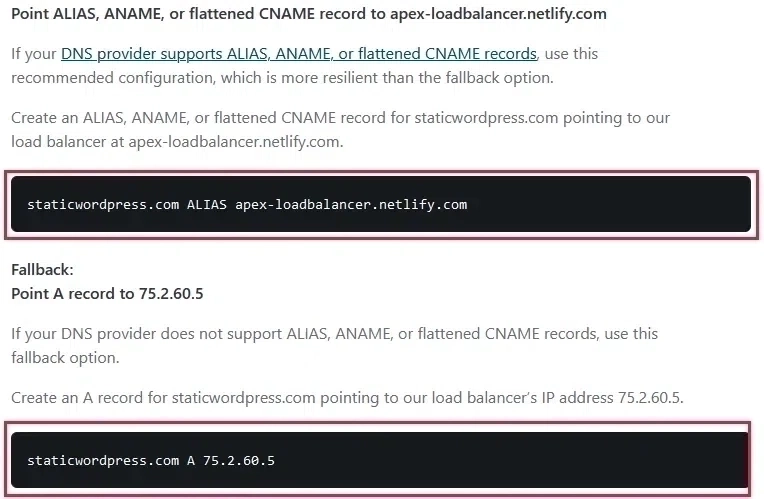
Add CNAME Record on Cloud Flare [Image Credits: Faisal Shahzad (SEO Wings)]
- Alternatively, you can use Netlify DNS by replacing DNS configurations on your registrar. It is similar to managing your DNS with Cloudflare, and Netlify also offers this service at no extra cost. Here is the list of Netlify DNS records. Add them to the appropriate location at your registrar. Netlify will show these DNS records, so copy them at an appropriate position at your DNS service provider.
dns1.p01.nsone.net
dns2.p01.nsone.net
dns3.p01.nsone.net
dns4.p01.nsone.net
You can watch our Youtube tutorial on how to achieve this.
WordPress on Netlify: How to Configure Netlify DNS with Namecheap - YouTube Video Opens in New Tab [See Terms and Conditions for 3rd party links.]
SSL Certificates
Netlify offers free SSL certificates to each of your websites. You do not need to do anything for your static WordPress websites hosted on the Netlify subdomain, and netlify will provide a valid SSL automatically.
Once your custom domain name is verified, this SSL certificate will automatically be added to domains/websites. Each installation of SSL is valid for three months and will be renewed at no extra cost.
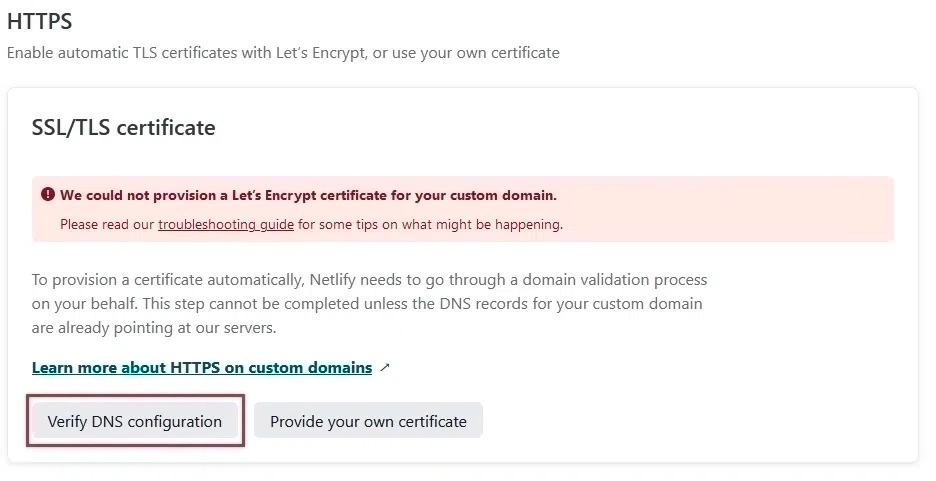
Netlify SSL/``HTTPS`` Certificates [Image Credits: Faisal Shahzad (SEO Wings)]
If you are using a custom web domain name on your website (as mentioned in the last section), you need to wait for some minutes/hours for the SSL certificate to be configured as it waits for DNS verification.
You can ask netlify to verify by clicking on Verify DNS configurations Once your DNS and domain ownership are verified, a new SSL certificate will be available for your domain.
Static WordPress Website Audit
Now that your static WordPress website is ready and already deployed. It’s an excellent idea to audit this static website to ensure all pages are available and no link is broken. For this, you can use any free or paid program.
- We recommend using screaming frog for the audit, as it will inform you about the missing pages and broken links. Missing pages will have 404 or 500 errors. Also, audit outbound links in the Screaming Frog software.
- If you use online tools, e.g., ahrefs or Moz, crawl on demand is also helpful.
- Not all tools are perfect. You might occasionally see missing files error on Google Search Console. COpy them and include them in your additional crawl pages.
If you encounter missing files errors, then copy those missing files and follow the same procedure as we have mentioned in the last section under “missing files and fonts.” Now, (re)generate your website and audit again until all errors are gone and you are happy with deployment.
How to update content?
Now that your WordPress and netlfiy are set up and ready for auto-deploy. You can use WordPress to create new content (blog posts, images, change SEO settings, sitemap, or robots.txt file).
Once ready for a new deployment, go to the deploy page and (re) generate your website. We recommend that you regularly audit your website for missing files/pages to keep your website’s technical and on-page SEO intact.
Conclusion
simply-static-post-process software can help you seamlessly deploy a Static WordPress Website using dynamic WordPress installation as the backend. This tutorial shows three additional plugins to link your dynamic WordPress website with your static WordPress website and update you with the deployment status.
This approach has several advantages, e.g., Higher loading speed, improved security, and no additional costs for hosting. Due to the hosting on Netlify, this approach is highly scalable, so if your user base is growing and you need more bandwidth, you can change your Netlify subscription plan accordingly.
Additionally, hosting static WordPress will positively impact your website and business. It will help if you spend fewer resources on website monitoring or additional money updating plugins/themes. Once everything is set up, this system is bound to run for years without explicit maintenance. It will also increase your website’s click-through rate (CTR) and better retention due to fast loading times and a smooth user experience.
Frequently Asked Questions

Faisal Shahzad
Hi, I am Faisal. I am working in the field of Search Engine Optimization (SEO) and Data Sciences since 2002. I love to hack workflows to make life easy for people around me and myself. This blog contains my random thoughts and notes on Digital Marketing, Affiliate Marketing, Static WordPress Hosting with Netlify and CloudFlare Pages, Python, Data Science and open-source projects.


